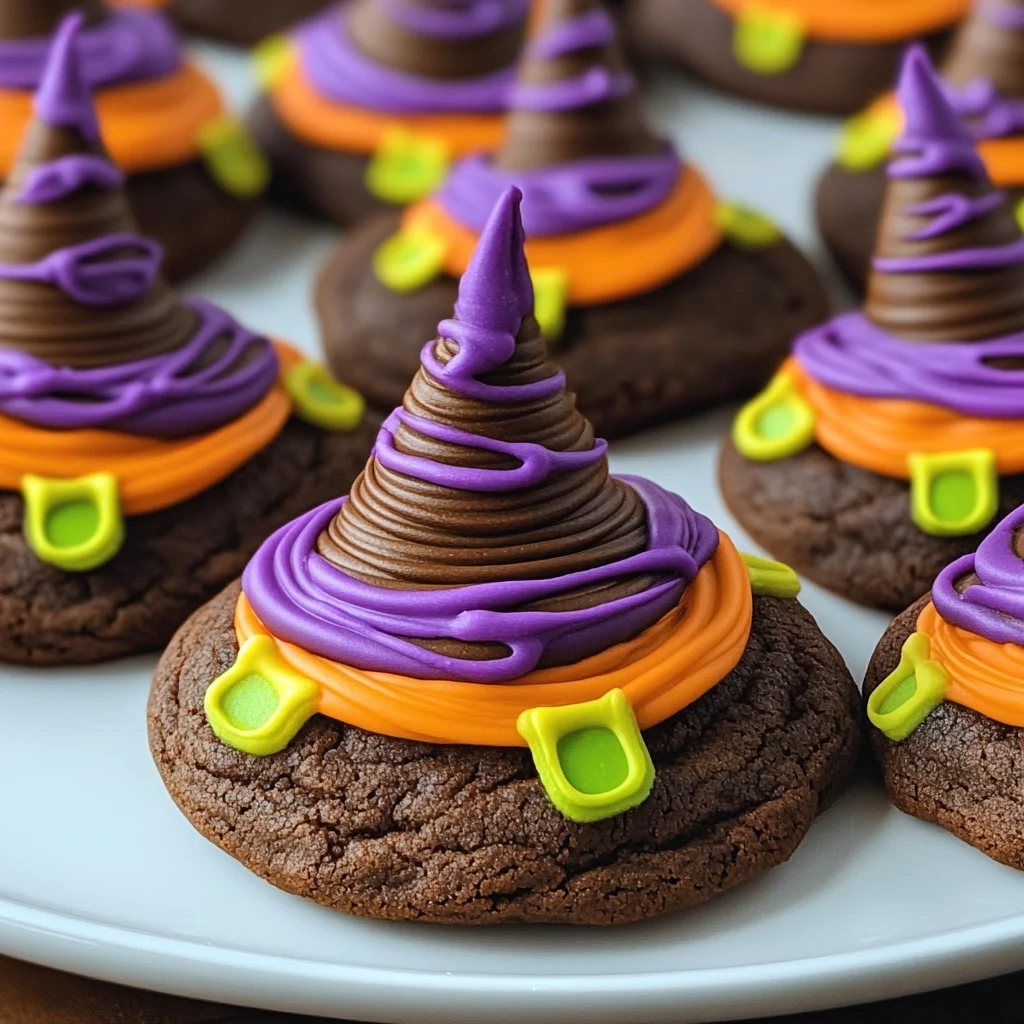
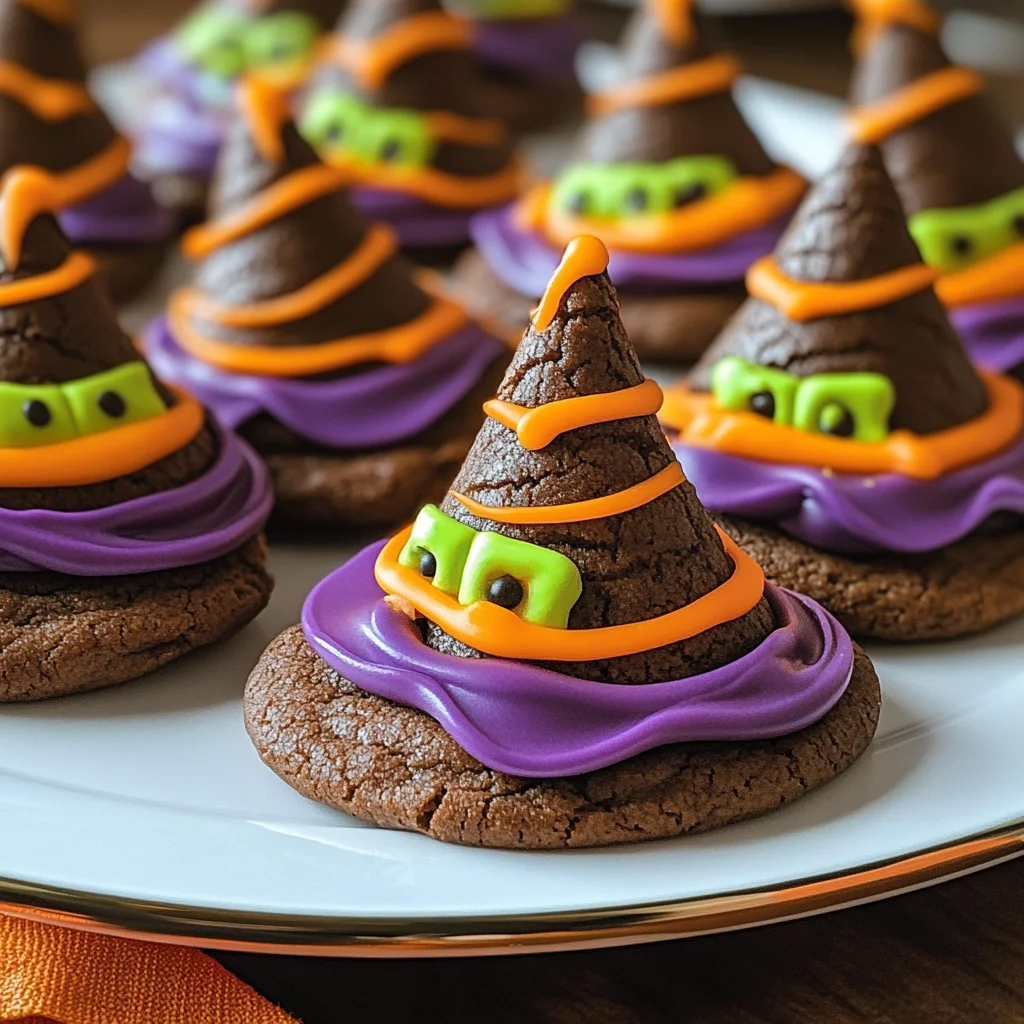
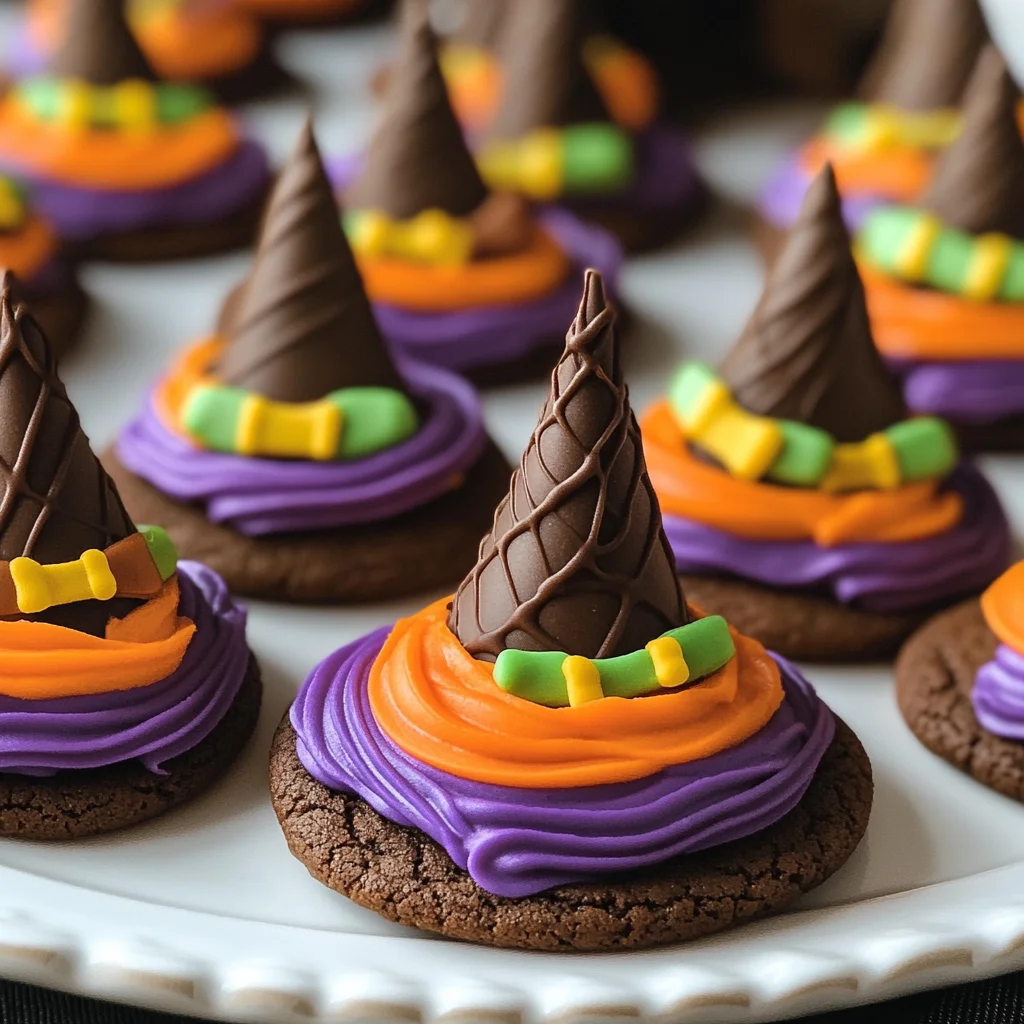
These Halloween Witch Hat Cookies are a delightful way to celebrate the spooky season. Bursting with chocolate flavor and fun, they’re perfect for Halloween parties or as a creative activity with kids. With a mix of colors and shapes, these cookies are not just treats but also festive decorations that will enchant your guests.
Why You’ll Love This Recipe
- Fun to Make: This recipe is an enjoyable project for families and friends, allowing everyone to get creative.
- Customizable: Use different icing colors and decorations to match your Halloween theme or personal touch.
- Deliciously Chocolaty: The combination of cake mix and chocolate cookies creates a rich, mouthwatering flavor.
- Perfect for Any Occasion: These cookies are ideal for Halloween parties, school events, or simply as a festive treat at home.
- Kid-Friendly: Simple steps make this recipe suitable for children to help out in the kitchen.
Tools and Preparation
Before you begin making your Halloween Witch Hat Cookies, gather the necessary tools. Having everything ready will streamline the process and make baking more enjoyable.
Essential Tools and Equipment
- Cupcake Cones Baking Rack
- Cookie Sheet
- Parchment Paper
- Decorating Bags with Tips
- Knife
- Spatula
Importance of Each Tool
- Cupcake Cones Baking Rack: This tool holds the sugar cones upright while baking, ensuring they cook evenly.
- Decorating Bags with Tips: These allow for precise icing application, helping you create beautiful designs on your cookies.
Ingredients
For the Cake Mix
- Favorite Cake Mix or Try Wilton’s Chocolate Cake Recipe
For the Cookies
- Store Bought Chocolate Cookies or Try This Recipe from Wilton
For the Icing Colors
- Lemon Yellow Icing Color
- Black Color Mist Food Coloring Spray
- Rose Icing Colors Pink Food Coloring
- Violet Icing Color, Gel Food Coloring
- Golden Yellow Icing Color
- Orange Icing Color
For the Decoration
- Sugar Cones
- Creamy White Decorator Icing, 4 lb. Tub
How to Make Halloween Witch Hat Cookies
Step 1: Prepare & Bake the Cones
- Prepare the cake mix following your chosen recipe’s instructions.
- Place the Cupcake Cones Baking Rack on a cookie sheet.
- Insert the sugar cones into the rack.
- Fill each cone with approximately 2 tablespoons of cake batter.
- Bake according to your recipe’s timing instructions and let them cool.
Step 2: Spray the Cones
- If necessary, trim any risen cake from the top of each cone using a knife.
- Place cones wide side down on parchment paper.
- Using Black Color Mist, spray each cone until fully covered.
- Allow them to dry for about 10 to 15 minutes.
Step 3: Tint the Icing & Prepare the Bags
- Tint 1 cup of creamy white decorator icing orange.
- For purple icing, tint another cup by mixing violet and rose colors.
- Prepare two decorating bags with tip 2B; fill one with orange icing and one with purple icing.
- Tint ¼ cup of creamy white decorator icing yellow by combining golden yellow and lemon yellow colors; place it in a bag with tip 3 attached.
Step 4: Assemble the Witch Hats
- Pipe a small amount of orange icing in the center of each cookie and place a cone on top.
- With tip facing outward, pipe an icing band around half of the cones’ wide ends; smooth with a spatula.
- Repeat this step using purple icing on the other half of cookies and cones.
- Allow them to set for about 15-20 minutes.
- Finally, use yellow tinted icing to pipe a buckle around each hat band and let them set for another 15-20 minutes before enjoying!
How to Serve Halloween Witch Hat Cookies
These Halloween Witch Hat Cookies are not only delightful treats but also a fun centerpiece for any Halloween gathering. Here are some creative serving suggestions to make your Halloween party even more festive.
On a Spooky Platter
- Arrange the cookies on a themed platter decorated with fake spider webs and plastic spiders for a hauntingly beautiful display.
With Festive Drinks
- Pair these cookies with spooky beverages like pumpkin spice lattes or ghostly milkshakes to enhance the Halloween spirit.
As Party Favors
- Wrap individual cookies in clear cellophane bags tied with orange ribbons, making them perfect take-home treats for guests.
In a Cookie Decorating Station
- Set up a station for kids to decorate their own witch hat cookies with extra icing colors and sprinkles, promoting creativity and fun.
With Themed Table Settings
- Use orange and black tablecloths, plates, and napkins to create a cohesive Halloween theme that complements your cookies.
How to Perfect Halloween Witch Hat Cookies
Making these Halloween Witch Hat Cookies is easy, but here are some tips to ensure they turn out perfectly every time.
- Use Fresh Ingredients: Always use fresh cake mix and icing colors for the best flavor and vibrant colors.
- Measure Accurately: Ensure you measure your cake batter accurately when filling the cones for even baking.
- Let Icing Set: Allow each layer of icing to set before adding another to prevent colors from bleeding into each other.
- Experiment with Colors: Feel free to mix different food coloring shades to create unique witch hat designs that stand out.
- Chill Before Serving: Refrigerating the cookies briefly after decorating can help the icing firm up and make them easier to handle.
Best Side Dishes for Halloween Witch Hat Cookies
To complement your Halloween Witch Hat Cookies, consider serving these festive side dishes. They will add variety and excitement to your dessert table.
- Pumpkin Soup: A warm and creamy pumpkin soup served in small cups makes a perfect savory contrast to sweet cookies.
- Spooky Veggie Platter: Offer an assortment of cut veggies arranged like creepy creatures, paired with a tangy dip for added crunch.
- Ghostly Cheese Straws: These cheese straws can be shaped like ghosts or bats, providing a delightful snack alongside the cookies.
- Witch’s Broomsticks: Pretzel sticks paired with cheese slices make easy-to-make broomstick snacks that tie into the theme.
- Monster Fruit Skewers: Assemble fruit skewers using grapes, melon balls, and strawberries; top them with googly eyes made from chocolate chips.
- Creepy Crawly Jello Cups: Layer green gelatin in clear cups with gummy worms peeking out for an eerie yet delicious treat.
Common Mistakes to Avoid
When making Halloween Witch Hat Cookies, it’s easy to overlook some important details. Here are common mistakes to watch out for:
-
Skipping the Cooling Step: Not allowing the sugar cones to cool properly before decorating can result in messy icing. Make sure they are completely cool before you begin.
-
Inadequate Icing Consistency: Using icing that is too runny will cause it to drip and lose shape. Aim for a thicker consistency that holds its form when piped.
-
Overfilling the Cones: Filling the cones with too much batter can lead to overflow during baking. Stick to 2 tablespoons of batter for best results.
-
Neglecting Food Color Mixing: Failing to mix food colors thoroughly can leave patches of uneven color. Take your time to blend until you achieve a consistent hue.
-
Not Allowing Time for Set: Rushing through the setting time between steps can lead to unstable witch hats. Be patient and let each layer set before moving on.
Storage & Reheating Instructions
Refrigerator Storage
- Store Halloween Witch Hat Cookies in an airtight container.
- They can be kept in the refrigerator for up to 5 days.
Freezing Halloween Witch Hat Cookies
- Wrap cookies individually in plastic wrap and then place them in a freezer-safe container.
- They will stay fresh in the freezer for up to 3 months.
Reheating Halloween Witch Hat Cookies
- Oven: Preheat your oven to 350°F (175°C) and warm cookies for about 5-7 minutes.
- Microwave: Place cookies on a microwave-safe plate and heat for 10-15 seconds.
- Stovetop: Use a skillet over low heat, cover, and warm cookies for about 2-3 minutes.
Frequently Asked Questions
Here are some common questions about making Halloween Witch Hat Cookies:
How do I make Halloween Witch Hat Cookies gluten-free?
You can substitute your favorite gluten-free cake mix when preparing these cookies. Be sure all other ingredients are also gluten-free.
Can I customize the colors of my witch hats?
Absolutely! You can use any food coloring you like to create unique designs for your witch hats.
How long do Halloween Witch Hat Cookies last?
When stored properly, these cookies can last up to 5 days in the refrigerator or up to 3 months in the freezer.
Can I use different cone sizes?
Yes, feel free to experiment with different cone sizes! Just keep in mind that larger cones may require additional cake batter and baking time.
What should I do if my icing is too thick?
If your icing is too thick, you can add a small amount of water or milk gradually until it reaches your desired consistency.
Final Thoughts
These Halloween Witch Hat Cookies are not only fun but also incredibly versatile. You can customize them with different colors and flavors, making them perfect for any spooky celebration. Whether you’re hosting a party or just enjoying some festive treats at home, give this recipe a try!

Halloween Witch Hat Cookies
- Total Time: 50 minutes
- Yield: Approximately 12 servings
Description
Get ready to enchant your guests this Halloween with delightful Witch Hat Cookies! These whimsical treats combine rich chocolate flavors and colorful decorations, making them a perfect addition to your spooky celebrations. Crafted using easy-to-follow steps, these cookies are not only delicious but also a fun activity for families and friends. Whether you’re hosting a haunted gathering or looking to treat your little ghouls and goblins, these Witch Hat Cookies will surely cast a spell of delight.
Ingredients
- Favorite Cake Mix (or homemade chocolate cake)
- Store-bought Chocolate Cookies
- Sugar Cones
- Creamy White Decorator Icing
- Food Coloring (orange, black, yellow, violet, rose)
Instructions
- Prepare the cake mix according to the package instructions.
- Insert sugar cones into a baking rack placed on a cookie sheet and fill each cone with cake batter.
- Bake as directed and allow to cool completely.
- Trim excess cake from the tops of the cones and spray with black food color until covered; let dry.
- Tint icings in various colors and pipe them onto the cookies to assemble witch hats.
- Allow icing to set before serving.
- Prep Time: 30 minutes
- Cook Time: 20 minutes
- Category: Dessert
- Method: Baking
- Cuisine: American
Nutrition
- Serving Size: 1 serving
- Calories: 180
- Sugar: 12g
- Sodium: 150mg
- Fat: 7g
- Saturated Fat: 4g
- Unsaturated Fat: 2g
- Trans Fat: 0g
- Carbohydrates: 27g
- Fiber: 1g
- Protein: 2g
- Cholesterol: 10mg